D.I.Y Craft
How to Sew a Scottie Dog
Denyse Schmidt of Denyse Schmidt Quilts saw her first Scottie Dog at the Elephant’s Trunk flea market in New Milford,
Connecticut many years ago and fell in love. She’s been collecting vintage patchwork Scottie Dogs (and photographing them
when her bed got too full) ever since. Just like old patchwork quilts, no two Scottie Dogs are alike—but they all have personality.
We’re not sure where the pattern originated, but, due to the proliferation of patchwork Scotties out there, it probably
appeared in a very popular women’s magazine in the 1940’s. And now, you can make your own!
1. Cut the Fabric
Cut a total of fifty-four 2-1/4″ squares of fabric – that’s 27
squares each for the Dog Front and Dog Back. Make sure to cut
on the straight grain of the fabric. We used a variety of colorful
wools and cottons, vintage and new, and tried not to repeat
any fabric (except on the other side of the dog). Cut the Side
Strip of the dog, 55″ x 2-1/4″. If you need to piece the Strip,
make sure the seam is perpendicular to the sides. The finished
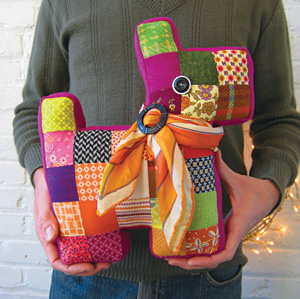
Scottie Dog is approximately 11″ wide x 12″ tall. If you want a
smaller or larger dog, change the size of your squares accordingly.
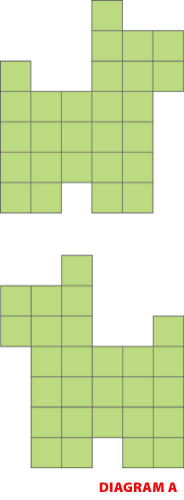
2. Design the Dog
Arrange the squares on a table in the shape of the Scottie Dog
Front and Dog Back. Be
sure to make them mirror
images of each other
(see Diagram A).
3. Sew the
Dog *
*All seam allowances
are 1/4″
With fabric right sides
together, sew the
squares together in
vertical rows. Press the
seam allowances either
up or down, alternating
the direction for each
row (up on first row,
down on second, etc).
When all the vertical
rows are assembled,
stitch them together in
order to make the Dog
Front. Repeat for the
Dog Back.
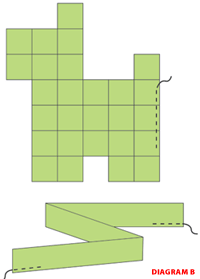
4. Attach
the Side
Strip
Before you attach the Side Strip, stay-stitch 4″ along the tail
end of the Dog Back, and 3″ along one long side of each end of
the Side Strip (Diagram B). This will serve as a guide for handsewing
the opening closed later. With fabric right sides together, and leaving 1″ of the end free,
sew Side Strip to Dog Front beginning below the tail end. Sew the
non-stay-stitched side to the Dog Front. Take care when stitching
the corners to
make sure they
stay square. At
outside corners,
stop stitching,
pivot with needle
down, and begin
stitching again.
Clip the corner
of the side strip.
At the inside corners,
stop at the
seam, back tack,
take needle out
and begin sewing
again at the seam
line on the next
square. Be careful
not to catch the
seam allowances
with your needle
when stitching
inside corners.
When you are
near the end, stop
and sew together
the ends of the Side Strip, trimming any excess fabric. Stitch the
remainder of the Side Strip to the Dog Front. Repeat, and sew
Side Strip to Dog Back, leaving a 3 square opening at the tail end
to stuff the Dog. Back-tack at the start and end of the opening.
5. Stuff the Dog
Stuff the dog with the stuffing of your choice. Turn under opening
at the stay-stitching and hand-stitch closed.
6. Attach the Eyes and
Decorate
This is the fun part—bring your Scottie to life and bestow a
unique personality with treasures from your stash of trimmings
and do-dads! Button eyes are fun, or use felt if giving the Scottie
to a small child. Ribbons and trim make great collars or scarves.
Arf arf!
Join the newsletter and never miss out on dog content again!
"*" indicates required fields
By clicking the arrow, you agree to our web Terms of Use and Privacy & Cookie Policy. Easy unsubscribe links are provided in every email.